Installing Windows on your computer is often an easy task if you have the right tools, such as a ready-made installation media like a CD or DVD, or maybe even a thumb drive containing Windows installation files.
The Setup process is rather quick, especially after the changes done in Windows 7 and newer. Creating a bootable Windows installation USB drive is also rather easy to do with tools like Rufus on a Windows machine, but what if you’re on Mac?
In this guide, we’ll show you step by step how to create a bootable USB flash drive containing Windows installation if you’re running macOS currently. This can then be used to install Windows on any computer, including the Mac in the cause.
What do I need to make a bootable Windows flash drive?
The following things are required to be able to create a bootable USB installation media for Windows:
- A USB flash drive (stick) of at least 8 GB. 4 GB Flash Drives may be too small to fit Windows 7 and newer on them, especially if the Windows ISO file contains multiple architectures, like x64 and 32-Bit. Windows 10 64-Bit ISO, for example, is about 5.5 GB in size.
- Any macOS version and Terminal (comes with Mac by default).
- A Windows ISO of choice, preferably 64-Bit if you have a newer PC with more than 2 GB of RAM. You can download Windows ISO for FREE from Microsoft’s website.
- Active Internet connection to download the ISO file. I assume you already have this if you’re reading this guide.
How to create a bootable Windows USB Flash Drive on Mac
Step 1: Prepare the USB Flash Drive
If you have any important files on the flash drive you plan to use for this, back them up somewhere safe. Everything on the flash drive will be erased. You have been warned.
With this warning in mind, please follow the steps below to prepare the Flash Drive for the Windows Installation. The Flash Drive cannot be any partitioning style, only a few types work. NTFS works best for speed, but macOS has very limited NTFS support. Your best bet would be to format the Flash Drive as FAT and MBR. Please follow the steps below:
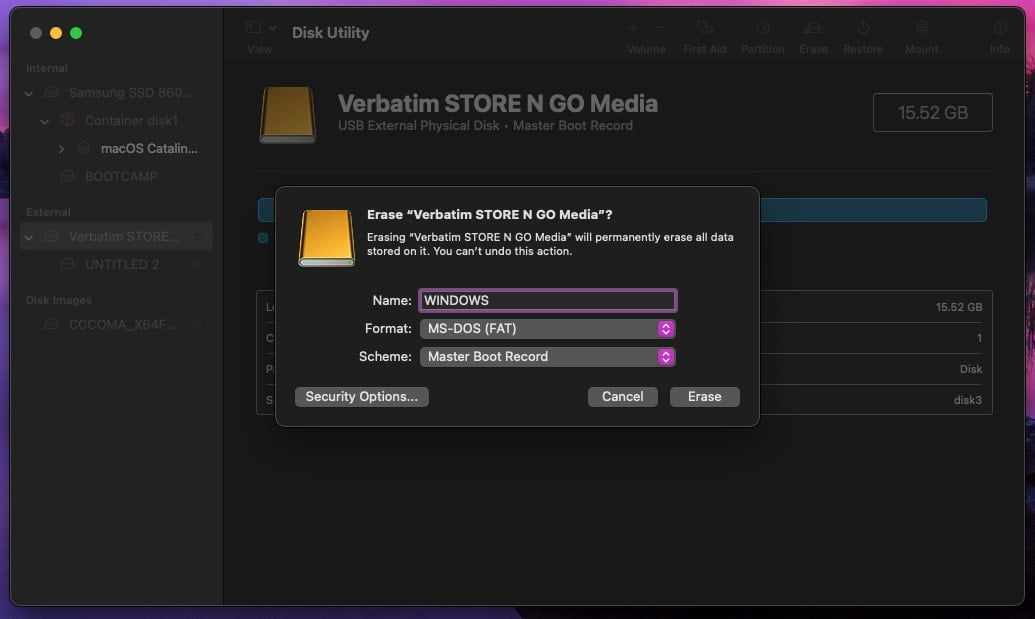
- Open Disk Utility on macOS (Found in Applications -> Other folder)
- Select the plugged-in USB Flash Drive and format it as MS-DOS (FAT) with Master Boot Record Scheme. Click Erase.

Step 2: Mount the Windows ISO on your Mac.
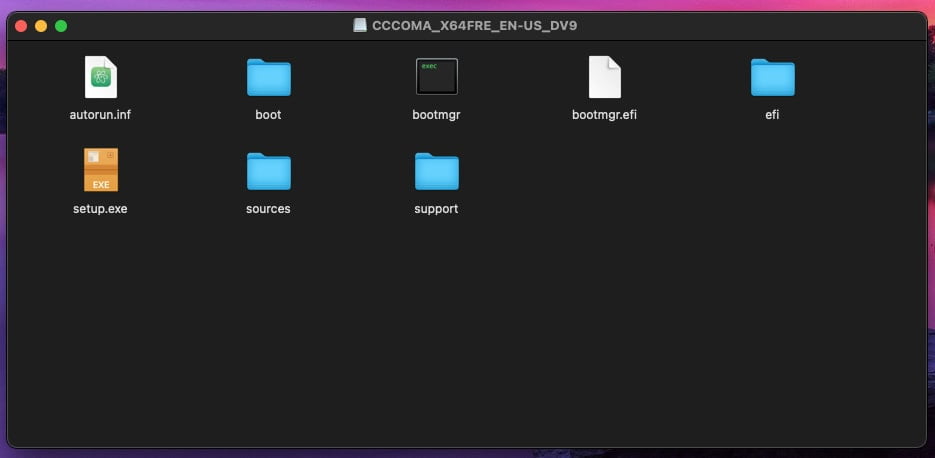
Mounting the ISO file is as simple as double-clicking the ISO file. After a few seconds, a new Finder window should appear containing all the files and folders inside the ISO.

Step 3: Copy the Windows Installation Files (Phase 1)
With the Windows ISO file opened, copy the following files and folders manually to the root of your USB Flash Drive.
- autorun.inf
- boot (folder)
- bootmgr
- bootmgr.efi
- efi
- setup.exe
- support
After this is complete, go ahead on your USB Flash Drive’s root and create a new folder called “sources” without quotes.
Copy everything from the sources folder of the Windows ISO into the sources folder of your USB Flash Drive, except for the install.wim file, because that one is way too big for the FAT format. We will deal with that in the next stage.
If you did everything right, the USB Flash Drive should now have everything from the ISO except for the install.wim from sources. Now we will deal with that one.
Step 4: Copy the install.wim File (Phase 2)
This file is way too big to fit the FAT format which allows a file to be smaller than 4 GB in size. We need to split this file into multiple ones to accommodate for this limitation.
A tool we can use to split this file on macOS is WimLib. You can easily install it via HomeBrew in the Terminal.
If you don’t have HomeBrew installed, copy and paste the following command in Terminal to install it:
/bin/bash -c "$(curl -fsSL https://raw.githubusercontent.com/Homebrew/install/HEAD/install.sh)"
You will be prompted for your user password. It’s the same local password you use for logging in on your Mac when it boots (not the Apple ID password).
After HomeBrew is installed, run the following command in Terminal to install WimLib:
brew install wimlib
Now to split the install.wim file using WimLib, follow the steps below:
- Copy the file from your Windows ISO’s source folder to the desktop.
- Open the Terminal and type the command below (adjust the paths to file as appropriate).
wimlib-imagex split /Users/george/Desktop/install.wim /Users/george/Desktop/install.swm 4000
IMPORTANT: Change /Users/george/ to your actual username.
After splitting is complete, copy the two files that result, install.swm and install2.swm to your Flash Drive in the sources folder.
That’s all with the creation of the bootable flash drive.
Step 4: Reboot your computer and boot from USB.
With the bootable Windows installation media now created, just reboot your PC and boot into the newly made USB flash drive. On Mac, you’d need to hold the Option key while you press the power button. Keep holding the option key until you see a yellow drive icon alongside an HDD icon. Select the yellow drive and press enter.
On a PC, each motherboard may have its own way of getting to the BOOT Menu. It’s Usually F8 or F12 while the computer starts. Keep spamming them during the motherboard logo. If none work, you can change the boot order in BIOS / UEFI, but you’ll need to search that up for your motherboard model as it can vary.

I’m so in love with this. You did a great job!!
Please provide me with more details on the topic
Please provide me with more details on the topic