Unc0ver jailbreak developed by Sam Bingner and Pwn20wnd (collectively known as the Unc0ver Team), is one of the most popular jailbreaks for iOS 11, iOS 12, iOS 13, and iOS 14, coming with Cydia by default and bringing an acceptable jailbreak quality even for the newer devices, such as iPhone 12, iPhone 11, iPhone XS, XR, and XS Max.
Unc0ver is a semi-untethered jailbreak, but this has been the norm in the jailbreak community for quite some time now (since iOS 9.2, back on Pangu Jailbreak‘s days). This is different compared to the old-school jailbreaks such as redsn0w which used to be tethered, or Pangu for iOS 7.1.2 which was fully untethered. Read on if you want to understand the difference between tethered, untethered, semi-untethered, and semi-tethered jailbreaks.
Wanna know if there’s a jailbreak available for your device on your current iOS version? Check our iOS Jailbreak Downloads page.
The difference between tethered, untethered, semi-untethered, and semi-tethered jailbreaks
Although you can split them into multiple other categories, most jailbreak tools ever released fit in one of these four categories. The type of jailbreak dictates how that jailbreak is re-enabled upon reboot, and whether it is a persistent jailbreak or it requires re-activation.
The four categories are as follows:
- Semi-tethered: Requires a PC and a jailbreak tool to run the jailbreak after reboot, but iOS can boot to stock without PC.
- Semi-untethered: Requires a PC to install, but then can be re-activated from the device without a PC after each reboot. A PC is needed to re-sign it every so often.
- Tethered: Requires a PC to activate the jailbreak and to boot the device. Without PC, a device reboot will result in the device going to Recovery Mode instead of booting to stock.
- Untethered: Maybe the most desirable, yet rarest jailbreak. Only requires a PC once, when you first install it. It persists after each reboot and doesn’t require signing or a PC ever again.
Unc0ver jailbreak is a semi-untethered jailbreak, so you only need a computer when you install it and when you re-sign the IPA file every 7 days (free Apple Developer account) or every year (Paid Apple Developer Account).
How to sign & install Unc0ver Jailbreak IPA using Windows / macOS (iOS 11 – iOS 14)
Up until 2020, a tool called Cydia Impactor used to be the de-facto tool for sideloading IPA files on iOS.
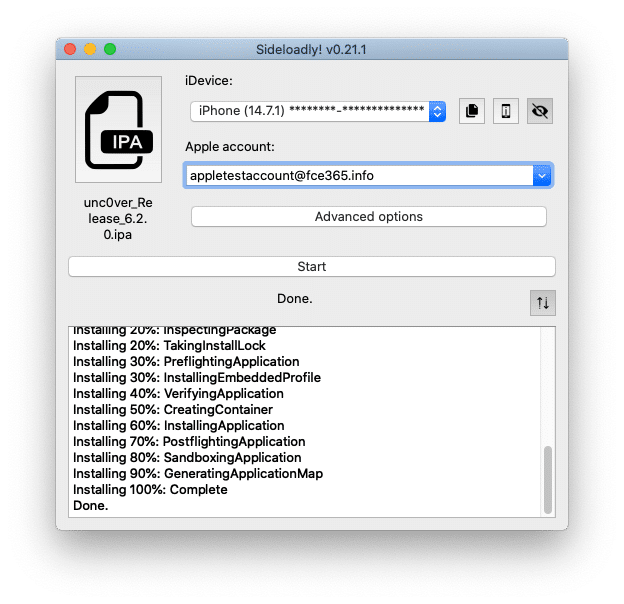
Nowadays, there are multiple methods that can be employed to sign and install Unc0ver jailbreak (or any IPA file, really) to your device, regardless of what model you have. The following guides apply for all devices including A12, A13, and A14 devices. For the purpose of this guide, we will use Sideloadly because it’s free, works on both Windows and macOS, and is feature-rich.
Sideloadly is a free Cydia Impactor alternative released by iOS Gods and it supports both Windows and macOS. Unfortunately, no Linux version is available. Sideloadly can be easily used by connecting your iOS device to the computer with a USB cable, opening Sideloadly, dragging and dropping the IPA file into Sideloadly, and having it signed and installed in seconds.
Please follow the steps down below if you wanna sign with Sideloadly.
- Download Sideloadly. (Download Sideloadly for Windows / Download Sideloadly for macOS 10.12+)
- Connect your iOS device to the computer using the USB cord. Make sure to Trust the computer if you get prompted.
- Download the latest Unc0ver jailbreak version from unc0ver.dev.
- Open Sideloadly. Make sure it shoes your iOS device connected.
- Drag and drop the Unc0ver IPA file you downloaded into the .IPA slot in Sideloadly.
- If it’s the first time you use the tool, it will ask you to log into an Apple account (to sign the IPA with a real certificate) – you can use a throwaway Apple ID if you wish.
- Wait for Sideloadly to say “Done”.
- On your iOS device, navigate to Settings > General > Profiles and Device Management > Your Apple ID e-mail > Unc0ver and tap Verify.
- That’s all. You can now open Unc0ver and press “Jailbreak”.
Important: If you use a free Apple Developer Account, you will have to redo the procedure above every 7 days to keep the app signed. This is an Apple-imposed limitation on sideloading.

It’s important to note that the process is basically the same both on Windows and on macOS if you use Sideloadly. The interface is pretty much the same, and the device connects pretty much the same. On Windows, make sure you have the latest iTunes installed so that the drivers for your iPhone are also present and working.
Troubleshooting Sideloadly
If you encounter any issues, please check below. If you cannot find your answer here, feel free to DM me on Twitter (@FCE365) or leave a comment below this post.
- The device is not recognized: Make sure it’s properly plugged in. On macOS, there’s a bug that causes the device to get connected/disconnected very fast. To fix it, run this command in Terminal: sudo killall -STOP usbd
- Could not connect to lockdown: Invalid Host ID: This is happening because your device isn’t trusting the computer yet. If you run a newer macOS, open Finder, select your device, and press Trust. You will be prompted to trust the computer on your device. On Windows and on older macOS, open iTunes and trust the device.
