
A vertical frame keeps less than a third of a landscape shot, which explains why conversions often look wrong. Subjects drift aside, people disappear and captions cover faces. Cropping every shot the same way causes these problems because wide shots and close ups need different framing decisions.
The process depends more on shot-by-shot choices than software alone. This guide shows the workflow using the Filmora video editor on macOS. Any video editor Mac users choose still requires careful reframing to keep subjects visible, balanced, and properly positioned.
Part 1. Create a 9:16 Project
Set the vertical ratio before you begin editing in your video editing software for Mac. A 9:16 crop keeps the full height but removes much of the original width, and the amount left depends on the source resolution. The table below shows how much horizontal resolution remains after the crop:
Source Frame | Full-Height 9:16 Crop | What That Means |
1920 x 1080 | 608 x 1080 | Has to be enlarged to fill a 1080-wide vertical frame |
2560 x 1440 | 810 x 1440 | Still short of 1080 wide, so some enlargement remains |
3840 x 2160 | 1215 x 2160 | Already wider than needed, so nothing gets enlarged |
Roughly two-thirds of the original width is lost in each case. However, 4K footage retains enough resolution after cropping to produce a sharp vertical frame, making higher-resolution landscape footage especially useful when you plan a vertical version.
Part 2. Import the Landscape Video and Review Each Shot
Before touching a single frame in your video editor Mac workflow, watch the footage once and take notes. Knowing which shots may cause problems makes the conversion faster and gives you a clearer plan for reframing.
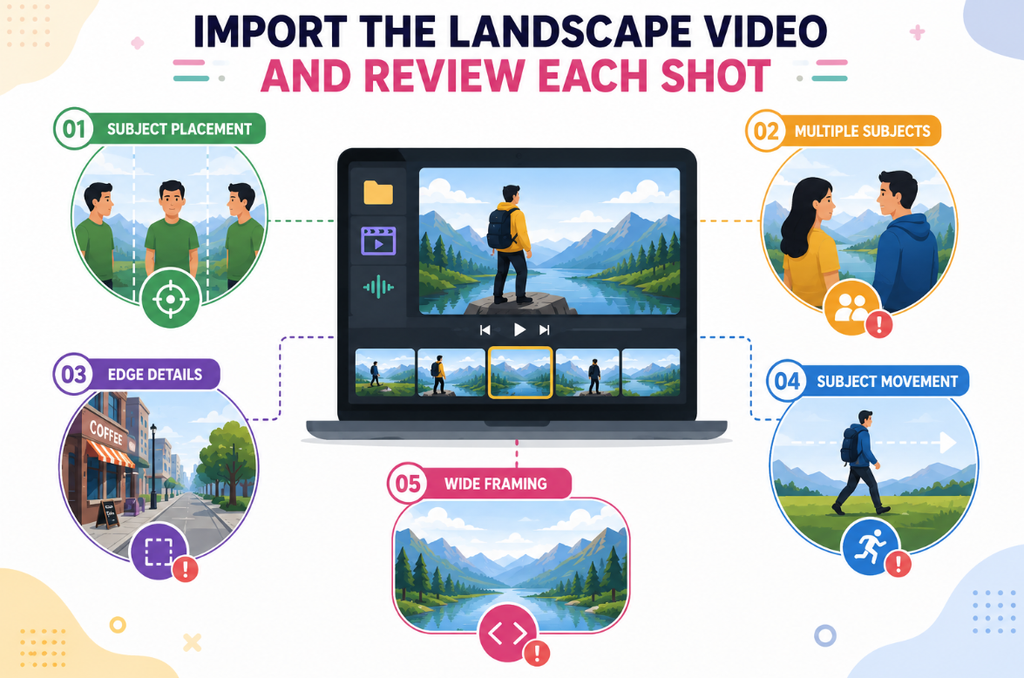
- Subject Placement: Note whether the person or product sits center, left, or right.
- Multiple Subjects: Flag any shot holding two people, because a crop keeps only one.
- Edge Details: Mark shots with signs, screens, or labels near the outer borders.
- Subject Movement: Separate the shots where somebody walks or moves across the picture.
- Wide Framing: Note the wide establishing shots, which rarely survive a crop at all.
Group those notes rather than working straight down the timeline. Handling every off-center shot in one pass is quicker than changing approach at each cut. The Filmora timeline guide can help you organize clips more efficiently as you work through these adjustments.
Part 3. Reframe the Video Manually
Most shots need to be reframed by hand, one at a time. In Filmora Mac, select a clip, then drag or scale it within the vertical frame to keep the important content in view. The table below shows how to handle the most common framing problems you may encounter:
Shot Type | How to Reframe It |
Centered Single Subject | A plain crop works, so leave the framing where it lands |
Subject Sitting Left or Right of Center | Slide the clip sideways instead of making it bigger |
Two People Talking | Cut between two crops rather than squeezing both into one |
Wide Establishing Shot | Scale it down and let the space above and below carry text |
Detail at The Frame Edge | Reposition onto that detail, then cut away before it leaves |
Anything Already Soft | Do not enlarge further, since the crop has cost pixels already |
Repositioning is usually better than scaling. Enlarging the clip reduces even more resolution after the vertical crop has already removed part of the original frame.
Part 4. Use Auto Reframe for Moving Subjects
Moving subjects need a different approach because a fixed crop can quickly leave them out of frame. Wondershare Filmora for Mac handles these shots with Auto Reframe, which follows the subject as it moves. Here is how to set it up step by step:
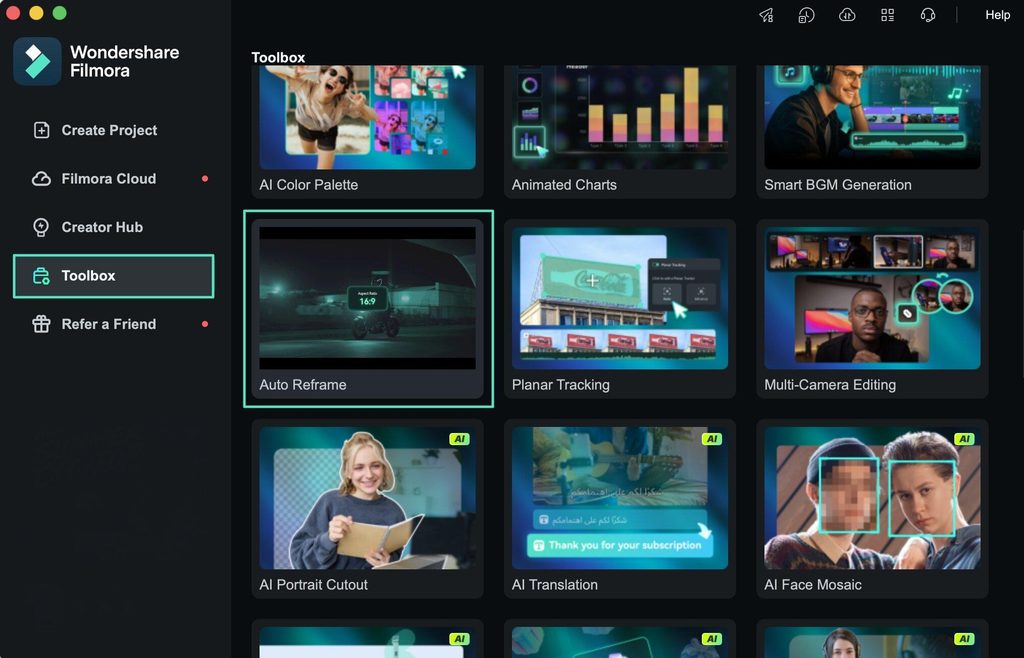
Step 1. Open Auto Reframe
Find “Auto Reframe” in the Toolbox, or right-click the clip in the media area and choose “Auto Reframe.” Either route opens the same workspace.
Step 2. Load the Clip and Pick the Ratio
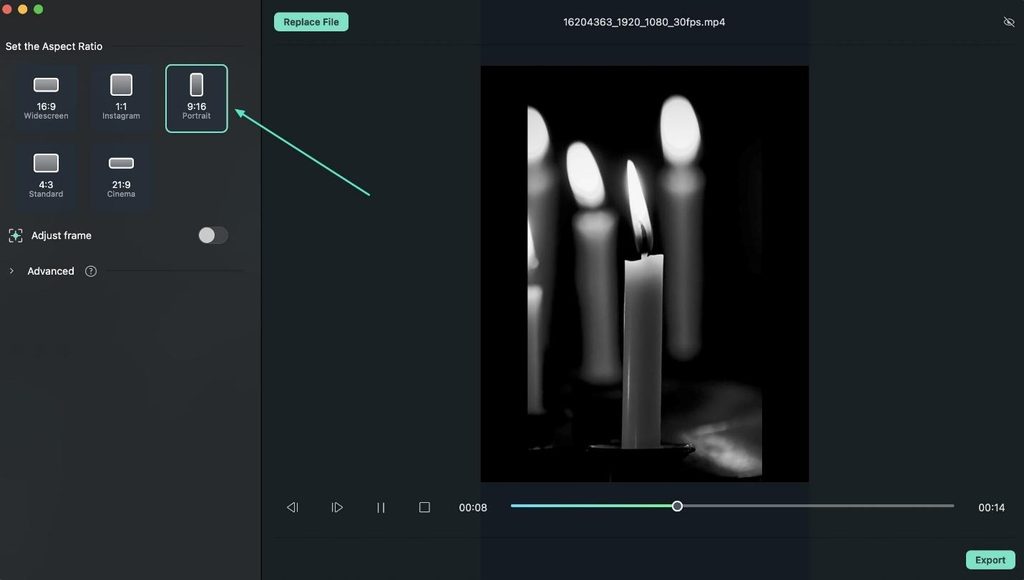
If needed, “Import” the clip into the Auto Reframe window, then choose “9:16” as the aspect ratio. This sets the vertical frame Filmora will follow during analysis.
Step 3. Set the Speed and Analyze
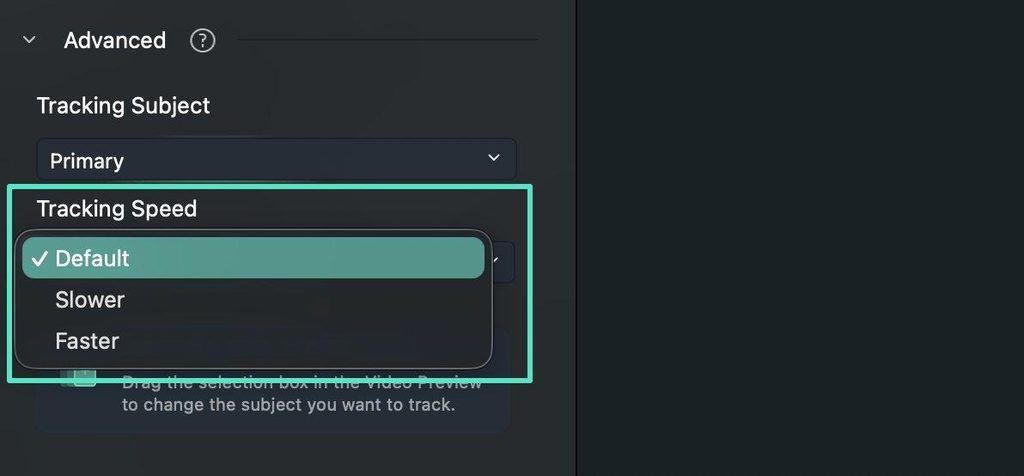
Leave “Tracking Speed” on “Default” for most clips or change it when the subject moves unusually fast or slowly. Change to “Slower” or “Faster” and let Filmora track the subject through the shot.
Step 4. Check What the Tracking Did
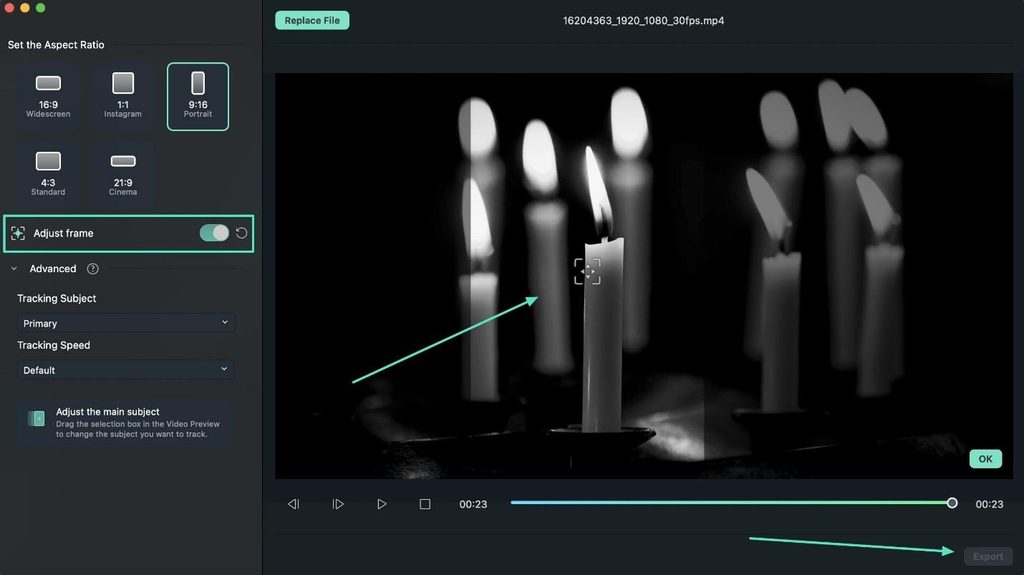
Play the result and check how the “Frame” follows the subject. Look closely at fast movement, direction changes, and moments when the subject moves near the edge.
Step 5. Correct It and Send It On
Switch on “Adjust Frame” to drag the box yourself. If Filmora follows the wrong subject, use the “Advanced” controls to change the tracking target. Once everything looks right, continue editing or “Export” the clip.
Part 5. Add Text for the Vertical Layout
A vertical frame gives you more height but far less width, leaving less room for titles and other on-screen text. Most video editing software for Mac lets you position text freely, but placement still matters once platform controls and captions appear. The table below compares safer text-placement choices with common layouts that can hurt readability or cover important content:
Safe Placement | Covers Something |
The upper middle band, clear of the top edge | The bottom strip, where captions and handles sit |
Wording sized to read on a phone held away from you | Desktop-sized wording that shrinks to nothing |
Short lines that fit the narrow width | Long lines that wrap three times over |
The empty space beside a scaled-down wide shot | Directly over a face or a product label |
Once the text is positioned, the Filmora export guide can help with the final output settings. Platform interfaces can occupy parts of the lower and right-hand areas of vertical videos, so keeping important text away from those zones helps it remain visible.
Part 6. Review Every Scene Before Exporting
Before exporting from your video editor on a Mac, review the finished vertical cut in two passes. Each pass catches a different type of problem: the first checks what happens within individual shots, while the second reveals framing or continuity issues between them.
Watch It Once at Full Speed
Play the whole video without pausing and note only where your eye goes wrong. Tracking drift, a head half outside the frame, and wording landing on a face all reveal themselves at normal speed.
Then Stop at Every Join
Go back and pause at each cut. Framing that works inside a shot can jump at the handover, and blank edges tend to appear where a scaled clip meets a full one.
Part 7. Export the Vertical Version
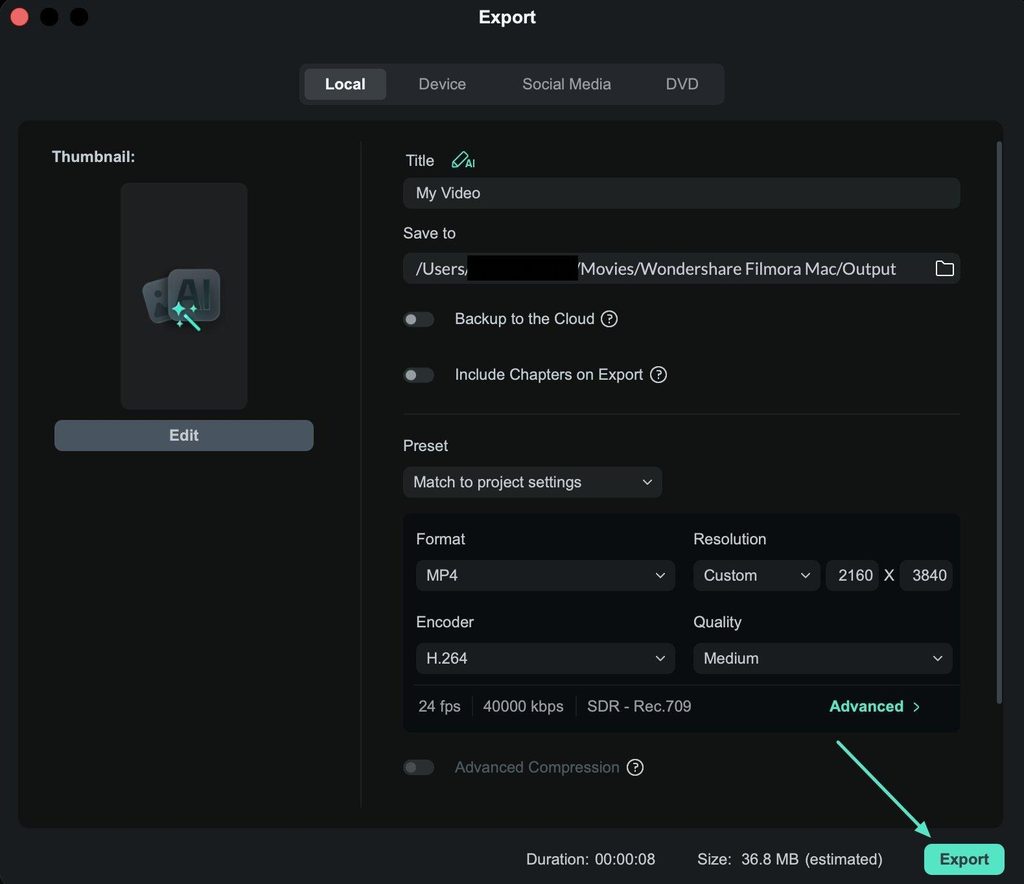
With the framing, text, and scene changes checked, the final step is to export the finished vertical video. Before starting the render, review the settings below to make sure the exported file keeps the format and playback choices you made during editing:
- Check the Output Orientation: Confirm that the exported video is taller than it is wide.
- Set the Vertical Resolution: Use 1080 × 1920 for a standard Full HD 9:16 vertical video.
- Match the Source Frame Rate: Keep the frame rate consistent with the source unless you have a specific reason to change it.
- Choose a Clear File Name and Folder: Label the file as the vertical version so it does not get confused with the original landscape edit.
Wondershare Filmora for Mac gathers these settings in the export panel. Check the final settings and preview before starting the export.
Conclusion
Automatic tracking helps with moving subjects, but it cannot decide what matters most in every shot. A good video editor Mac workflow still requires shot-by-shot reframing, careful review, and knowing when to scale rather than crop. For a smoother mix of manual control and Auto Reframe, Filmora is a practical choice for Mac users.
More iDevice Central Guides
- iOS 17 Jailbreak RELEASED! How to Jailbreak iOS 17 with PaleRa1n
- How to Jailbreak iOS 18.0 – iOS 18.2.1 / iOS 18.3 With Tweaks
- Download iRemovalRa1n Jailbreak (CheckRa1n for Windows)
- Dopamine Jailbreak (Fugu15 Max) Release Is Coming Soon for iOS 15.0 – 15.4.1 A12+
- Cowabunga Lite For iOS 16.2 – 16.4 Released in Beta! Install Tweaks and Themes Without Jailbreak
- Fugu15 Max Jailbreak: All Confirmed Working Rootless Tweaks List
- iOS 14.0 – 16.1.2 – All MacDirtyCow Tools IPAs
- iOS Jailbreak Tools for All iOS Versions


